Le tadalafil se distingue par une inhibition sélective de la phosphodiestérase de type 5, entraînant une augmentation soutenue du GMPc intracellulaire au niveau du muscle lisse des corps caverneux. Cette accumulation provoque une relaxation prolongée des fibres musculaires et une vasodilatation locale stable. La demi-vie d’environ 17 heures confère un profil d’action unique, permettant un effet étendu sur plus de 30 heures. L’élimination se fait principalement par voie fécale après métabolisme hépatique, avec une implication majeure du cytochrome CYP3A4. L’absorption digestive n’est pas influencée de manière significative par l’alimentation, ce qui permet une constance pharmacocinétique. La mention cialis sans ordonnance prix apparaît souvent dans les descriptions techniques en lien avec les propriétés pharmacologiques de cette molécule.
Preparation and administration of subcutaneous injections
Preparation and Administration of Subcutaneous Injections By Jena Koshaish, PharmD Disclosure: This information is intended to educate parents and caregivers about the techniques of preparing and administering subcutaneous (SQ) injections to children. This information is not meant to replace specific instructions from your healthcare provider. We encourage all parents and caregivers to speak to their healthcare providers about receiving specific hands-on instruction to prepare and administer SQ injections before attempting it at home. Introduction
There are several reasons why your child might have been prescribed an injectable medication. For instance, there is not a suitable alternative oral medication to treat their condition or the medication is only supplied as an injectable because it cannot be absorbed from the stomach through the oral route. Specific medical conditions that often require SQ medications are diabetes and clotting disorders of the blood. In diabetes, specifically Type 1 Diabetes, insulin is required to maintain normal blood sugar levels. This medication is only available in the SQ form. Although Coumadin, an oral medication, can be used to treat conditions involving clotting disorders of the blood, this medication involves frequent monitoring, special diets, and has an increased risk of bleeding. Therefore, SQ medications, such as Lovenox, Heparin, or Fragmin, can be used to treat clotting disorders, which have a lower incidence of bleeding and no diet restrictions. Subcutaneous injections can be supplied as prefilled syringes or the pharmacy may provide you with a vial of medication and syringes with which to drawn individual doses from the vial. In the case of prefilled syringes, they can either be administered directly to your child or they may also be dispensed with separate, empty syringes to draw smaller, individual doses. We will discuss how to prepare individual doses from a vial of medication and an empty syringe. Preparing Your Child’s Subcutaneous Medication So you’re child was prescribed an injectable medication, what now? Don’t panic, this section is meant to give you step-by-step instructions on how to prepare you child’s medication. Please see the following section for specific instructions on how to administer the subcutaneous injection. Preparing the medication from a vial and an empty syringe Supplies you’ll need before you start:
Alcohol swaps Cotton ball and/or a bandage Disposable needles (sharps) container 1 ml syringes with needles Vial of medication Step 1:
Wash your hands with soap and water for 15 to 30 seconds and dry them thoroughly. Step 2: Take off the cap on the top of the vial, and swipe with an alcohol swab in 2 sweeping motions. Your pharmacy may have given you two sizes of needles, one for drawing medication from the vial and another for administering the injection. The needle used to remove the medication from the vial is thicker (smaller gauge) and sturdier than the needle used to inject your child. The needle used to inject your child is thinner (larger gauge) to reduce pain upon injection, as well as, more flexible which may cause it to bend if used to draw medication from the vial. Therefore, it is important to remember to use the thicker (smaller gauge) needle to remove medication from the vial, and to use the thinner (larger gauge) needle to administer the SQ injection to your child.
Step 3: Attach the needle to the syringe by twisting it onto the top of the syringe. DO NOT uncap the needle until you are ready to insert it into the vial. Note: Skip this step if the syringe is supplied with a needle already attached.
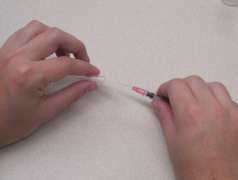
Step 4: Uncap the needle by pulling NOT twisting the cap directly away from the needle in a quick sweeping motion.
Do not let the exposed needle touch anything, as this will spread germs onto the needle, possibly infecting your child. If the needle touches a surface, other than the rubber stopper of the vial, remove the needle and replace it with a new capped needle. Place the old needle in your “sharps” container and begin again with Steps 3 and 4.
Step 5: Fill the syringe with a small amount of air, usually about three-quarters of the actual dose of the medication (i.e. if the dose is 1 ml, fill the syringe with 0.75 ml of air). This will make it easier to remove fluid from the vial.
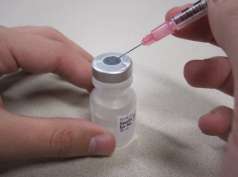
Step 6: Puncture the rubber stopper of the vial with the needle bevel side up at a 45 degree angle. This technique will prevent coring, which is when the needle rips a small piece of the rubber stopper into the vial.
Once the needle is inside the vial, inject the air into the vial by pushing on the plunger of the syringe.
Step 7:
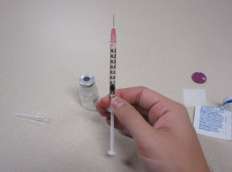
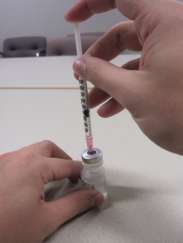
Lift the vial off the table, with the needle still inside, and place your left index finger and thumb around the vial. With your other hand around the syringe, pull back on the plunger of the syringe to fill it to the level of the dose your healthcare provider prescribed.
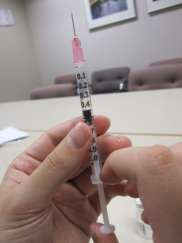
Note: Make sure that the tip of the needle remains in the fluid to avoid drawing up air into the syringe. Step 8: Once the syringe has been filled with the desired dose, pull out the syringe from the vial. If you notice air in the syringe pull back on the plunger and gently tap the side of the syringe, then push the plunger up just until you see the medication fill the inside of the needle hub. This will ensure that no air is injected when the medication is administered.
Carefully change the needles from the smaller gauge to the larger gauge needle. Do not uncap the needle until
you are just about to administer the SQ injection. Please see the administration section for more instructions.
Administering Your Child’s Subcutaneous Medication Your healthcare provider will instruct you on the preferred sites on your child’s body to administer the SQ injection. It may be helpful for another adult to hold your child in a comforting and reassuring position while you administer the medication. Step 1: Wipe the area with an alcohol swab where you plan to inject the medication. Allow the area to dry for 10 seconds. Step 2: Remove the cap of the needle and grasp the syringe, as if holding a pen.
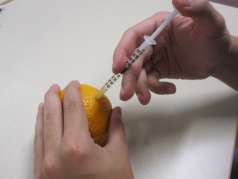
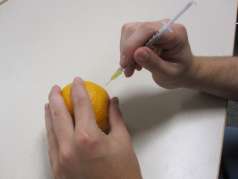
Step 3: Lightly pinch your child’s skin with your free hand, about 1 to 1 ½ inches.
Step 4: Insert the needle of the syringe swiftly and firmly into your child’s skin. Inject the medication by pushing in the plunger of the syringe. Make sure to deliver the entire dose. Step 5: Pull out the syringe gently and press a cotton ball over the injection site for 3 to 5 seconds to make sure the medication is absorbed. You can also place a band aid on the injection site. Step 6: Throw away all the needles “sharps” into the container provided by your healthcare provider or a hard plastic container, like a milk jug. DO NOT attempt to recap any needles. If the vial of medication is for multiple use, be sure to store it according to the instructions provided by your pharmacist or healthcare provider.
Publications (2008-2009) 1. Kraiczy, P ., Seling, A., Brissette, C. A., Rossmann, E., Hunfeld, K.-P., Bykowski, T., Burns, L. H., Troese, M. J., Cooley, A.E., Miller, J. C., Brade, V., Wallich, R., Casjens, S., and B. Stevenson. Antibodies against Borrelia burgdorferi complement regulator-acquiring surface protein 2 (CspZ) as a serological marker of human Lyme disease. Clin. Vaccine Immun


 Preparation and Administration of Subcutaneous Injections
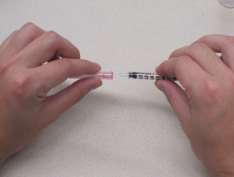
 Step 5:
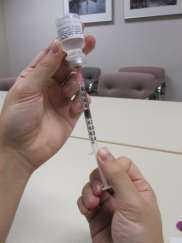
 Step 7:
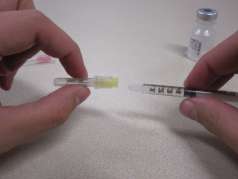
 Carefully change the needles from the smaller gauge to the larger gauge needle. Do not uncap the needle until
you are just about to administer the SQ injection. Please see the administration section for more instructions.
Carefully change the needles from the smaller gauge to the larger gauge needle. Do not uncap the needle until
you are just about to administer the SQ injection. Please see the administration section for more instructions.